Making your own bow from one piece of wood can be an incredibly enriching experience. The procedures I will outline below are those that I have followed over some 10 years to make bows that I now shoot and hunt with exclusively. If you are cutting and seasoning your own wood there are some basic information on wood seasoning that you may find elsewhere on this site.
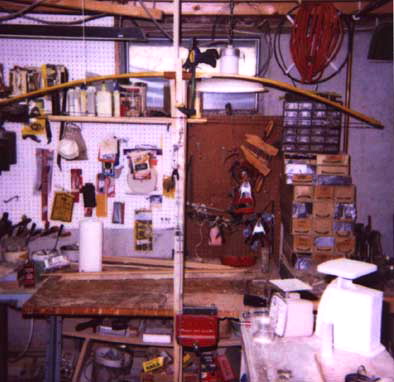
My bows are made mostly with hand tools but I do use a stationary belt sander to remove some wood and in the finishing process. The sander is not necessary. The hand tools I use are a draw knife, scraper, pen knife, Stanley Shurform plane, and a coarse and fine wood workers rasp. You will also need some coarse, medium and fine sandpaper.You will also need some way to keep the stave immobile as you work on it. When I first began, I used a wood workers vice. I rapped rags or leather around the bow to keep the metal jaws from damaging it. There are some plans for a bow bench elsewhere on this site.
The back of your stave must be reduced to one continuous growth ring unless you are making a board bow. For hickory, ash and oak once you remove the bark with your draw knife, the back is ready for the bow making process. Boards have been discussed in my previous web pages. Black locust and osage must be prepared in a different manner. They must be reduced to inner growth rings. The sapwood in both of these species is the lighter wood and the heart wood is the darker wood. I have had success reducing the locust to the ring just above the heart wood while osage must be brought down to the heart wood and even below. I do this wood removal with a draw knife and sandpaper. Any knots left in the wood must be carefully worked. Do not cut through them but leave them standing proud above the wood. Be careful to not cut through the growth rings. Work a knot with your pen knife. Let the knot swirl by leaving a little extra wood on the width. I have not really discussed using osage because my interest in bow making revolves around materials the local New England Indians used. Osage is not native to this area. A good width for osage is 1 1/1/4 inches wide. For the beginner, my suggestion is to use a board or ash, oak, or hickory tree staves. The back of the bow must be in pristine condition or the bow will fail. It must have no nicks or cuts. Email me and I will provide you with suggestions as to where you may purchase the above if you do not wish to cut your own wood.
To lay the bow out reduce the stave to a width of 3 in. or so. With a pencil, draw a line down the middle of the stave. Measure 0.75 to 1 in on either side of the center line making for a width of 1.5 to 2 in depending on the species of the wood. For locust a width of 1.75 in. is good while for ash and hickory a width of around 2 inches works well. As far as the total length of the bow is concerned, take your draw length and double it and then add around 20%. For example, if your draw is 26 inches the minimum length for your bow should be 64 inches. That is the minimum, but 66 inches for the beginner is probably better as it allows a margin of error. Find the center of the stave and measure 2 inches on either side for the handle. This makes for a 4 in. handle. The width of the handle I like is 1 1/4 inches. The thickness is 1 3/4 inches. Let the width flare out gradually to full width after a distance of 2 inches on the upper and lower limbs. That gives a total non bending handle portion of 8 inches. This type of bow is called a handle bow. An easier design is possible. let the bow's width b 1.5 inches to mid limb and taper to the nocks as described below. Allow the bow to bend slightly in the handle and the bend to increase out ward to the nocks. From mid limb to the nocks, the bow should taper to 1 in. nocks and later to 0.5 in. nocks as the bow nears completion. I also leave the handle wide for handle bows until the bow is almost finished to assure the string tracks on the handle. The nocks can be cut further slightly on the offending side to bring he bow on the handle or closer to its center.
With your draw knife or with your hatchet begin to remove wood from the belly of the bow. Take your time here or you will end up with a 25 lb bow when you want a 50 lb draw. As you remove the wood periodically floor tiller the bow. Place the stave with the nock end on the floor and pull at the handle to check the bend of the bow. The limbs must bend evenly with no flat spots. This called floor tillering. The bow should show not bend until just past the fade area of the handle section. Stop floor tillering the bow when you feel you have attained a weight that is around 30 lbs heavier than the draw that you want.
Cut the nocks in your bow. I use a hack saw. A wood vice helps hold the bow immobile. It is my preference to measure down 0.5 in. and 0.75 in. Connect with a pencil line. Cut with the hack saw. Widen with he chain saw file. Go to a hardware store and obtain a chord of thickness similar to the pull chord of a lawn mower. Leave it about 10 inches longer than the length of your bow. This we will call your tillering string. It should be fastened to the nocks with a loop.
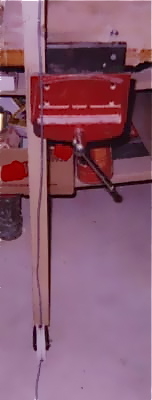
I tiller my bow with a pulley arrangement so I can stand about 10 feet away and observe how the limbs flex. A holder is made at the top of a 2x4 to contain the bow. The bow is clamped in with a wood clamp to keep it from moving. A pulley is fastened on the bottom. The 2x4 is clamped in my vice. My vice is securely clamped on my bench with bolts and sheets of iron as much force will be applied to it. A very stout chord is attached to the bow and put through the pulley. If you have wall space attach the bow holder and pulley securely to the wall.
I remove wood with my Stanley Shurform from both limbs. Remember to flex the bow 20 times or so to program your wood removal into the wood fibers. Both limbs must bend evenly. Measure the weight with a spring scale. You must never draw the bow beyond 5-10 lbs. of the finished draw weight. At 10 in.of string movement I again measure the draw weight of the bow. If I want a 50 lb bow and the scale shows 50 lbs. I stop and string the bow. I use a bow stringer. Your knocks may be fashioned to fit the stringer. The stringer, the scale and the string may be bought from archery suppliers. I like the scales that register the weight even after you let down.
Now comes the fun part. You must now bring the stave to full draw and at the same time reach your draw length. If the limbs are bending evenly at a short draw of 10 inches and are at your potential draw weight remove wood evenly from both limbs. I use my Stanley Shurform at this point. Here is a trick. Scribe pencil lines on the limbs. Remove wood until they are gone. That way you won't remove too much wood at one time. Remember not to draw the bow beyond 5-10 lbs over the finished weight and remember to flex the bow after wood is removed. When I get within 6 in. of my draw I begin alternating a scraper and my Stanley. When I get within 2 or 4 in. I use only the scraper. Scrapers are available at woodworker supply houses. Leave the finished weight 5 lbs over your desired weight to allow for finishing.
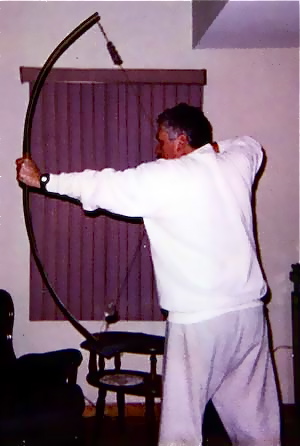
The bow pictured below has a very short, narrowed handle section and bends evenly from the end of the fades to the nocks. The bow should not start to bend until the fades are reached and it should bend evenly in an elliptical arc with the bend increasing toward the nocks.
Remove all marks with a pen knife held at right angles to the bow. Sand your bow with coarse, medium and fine sandpaper. I use waterproof stains and urethanes only on my bows as they are safer for me and for the environment.
You may shoot off your hand a glue a small leather or wood shelf for the arrow to rest on. Wrap some leather or twine around the handle and secure it with glue. Congratulations you have made a fine shooting weapon. Even if you haven't you have probably learned a great deal. I had 14 failures before I got a bow that would shoot and I needed one more try before I was able to make a hunting quality weapon.Let me know of your success and of your failures.
Copyright 1999 George C Tsoukalas
